The purpose of two-factor authentication is to have a second layer of protection to minimize the risk of fraudulent attempts and help maintain security.
We do this by sending a one-time password (OTP) to your OTP default channel for certain activities. OTPs are numeric security code (up to 7 digits). The code is time sensitive and valid only for a limited amount of time.
Features that have two-factor authentication are:
-
Registering for digital banking/First time login
-
Forgot password/Self-serve password reset
-
Add a bill payee
-
login - when using a new device and browser for the first time
Entering an OTP incorrectly three times will lock the member out of digital banking and the member will need to contact us to unlock their account.

We’ll send your one-time password by email or text message depending on the OTP default channel you choose on the two-factor authentication page.

Your one-time password is temporary and designed to be used for one session only. Your OTP will expire five minutes after it's sent. Once this time has expired, a new OTP will need to be requested.
If you haven’t received your OTP to your OTP default channel (email or mobile phone), you can request another.
If your OTP default channel is set to email, don't forget to check your junk or spam folder.
Check that your OTP contact details are up to date on the Two-Factor Authentication page. This can be done through online banking and the mobile app. If your details have recently changed, update your mobile number or email address before you request another OTP. Log out and try again.
If you're not receiving an OTP through email, try to validate using your mobile phone.
Call our Member Contact Centre at 1-800-667-7477 if it still doesn't arrive after you request it.
Call our Member Contact Centre at 1-800-667-7477.
This is typically because the browser updated on the device (i.e. laptop or mobile phone). The Conexus mobile app accesses the default browser on the mobile phone during the login process.
Two-Factor Authentication is mandatory to ensure the highest level of account security. By requiring two forms of identification (your password and a second factor), it significantly reduces the risk of unauthorized access. This extra layer of security helps protect your personal and financial information, making it more difficult for unauthorized individuals to gain access to your account.
Conexus recommends choosing the mobile channel as it is the more secure option. If mobile is not available to you, you can choose email as an alternative. During the setup process, you will be guided on how to choose your preferred method.
If you don’t have a mobile phone or are unable to receive SMS messages, you can choose to use your email as your default channel. You can also change your one-time password default channel at any time.
-
Navigate to the two-factor authentication page based on the current application you’re using:
-
Online (web browser): Log in and go to My Conexus at the top > Choose Security > Two-factor authentication
-
App (Android and Apple): Log in > at the bottom right-hand corner of the main menu, click More > My Conexus > Security > Two-factor authentication
-
-
Select the channel you'd like to receive one-time passwords – SMS (text messages) or email. We recommend opting for SMS as it is the more secure channel.
-
Input your contact information. Click validate. A one-time password will be sent to you.
-
Once validation is complete, click save at the bottom of the page. Done!
No, Two-Factor Authentication is mandatory for all members to ensure the security of your account. While it may feel inconvenient at times, the added layer of security significantly reduces the risk of unauthorized access and protects your personal and financial information. Cybercriminals are constantly evolving, and Two-Factor Authentication is an effective way to stay ahead of their tactics. Your security and peace of mind are our top priorities, and we are committed to providing you with the highest level of protection.
-
From the login page, click Forgot password
-
Enter Username
-
Select Email or Mobile phone, and enter your details, click Reset password
-
If your contact details match what we have on file, you'll receive an email to reset your password (may take a couple of mins, check junk email if not received)
-
Open email, click Reset your password
A one-time password will be sent to you via SMS or email and a new window will open where you can reset your password.
No, you can only open individual accounts through digital banking. If you want to open a joint account, you can either call our Member Contact Centre at 1-800-667-7477 or visit a branch.
You will need to call our Member Contact Centre at 1-800-667-7477 to retrieve your username.
No, you will need to have valid email address to use digital banking. This is to support you with features such as “Forgot Password”. A mobile phone number is optional to use with digital banking for features such as one-time passwords and notifications.
Simply put, it helps to prevent fraud on your account. It's ideal to use geolocation so that we can identify odd log in attempts from new locations. This will flag that something isn't quite right.
We only use geolocation to determine whether fraud is happening on your accounts. We don't use this information for any other purpose and we don't share this information - it's strictly to help keep your account safe.
Our members' privacy and security is of utmost importance to us. Our digital banking platform is designed with your security in mind. For example, we use one-time passwords as an added layer of security for key transactions, like resetting a password or adding a bill payee. These one-time passwords are sent to your email or mobile phone and must be input into the platform when prompted. This extra step serves as verification of your identity and helps ensure you intend to do these transactions.
Please fill out our Connect With Us form and we will contact you.
No, once you’ve chosen a primary username, you won’t be able to change it. However, once you’ve logged into the new platform, you’ll have the option to create a secondary username, which can be changed.
You can do this by clicking on My Conexus > Security > Change username.
No, you will need to call our Member Contact Centre at 1-800-667-7477 or visit a branch for assistance.
You will need to sign into the new Conexus Digital Banking Platform to create a new username, accept terms and conditions and validate any additions or edits to your information with a one-time password.
Both the mobile app and web browser can be used for completing first time login.
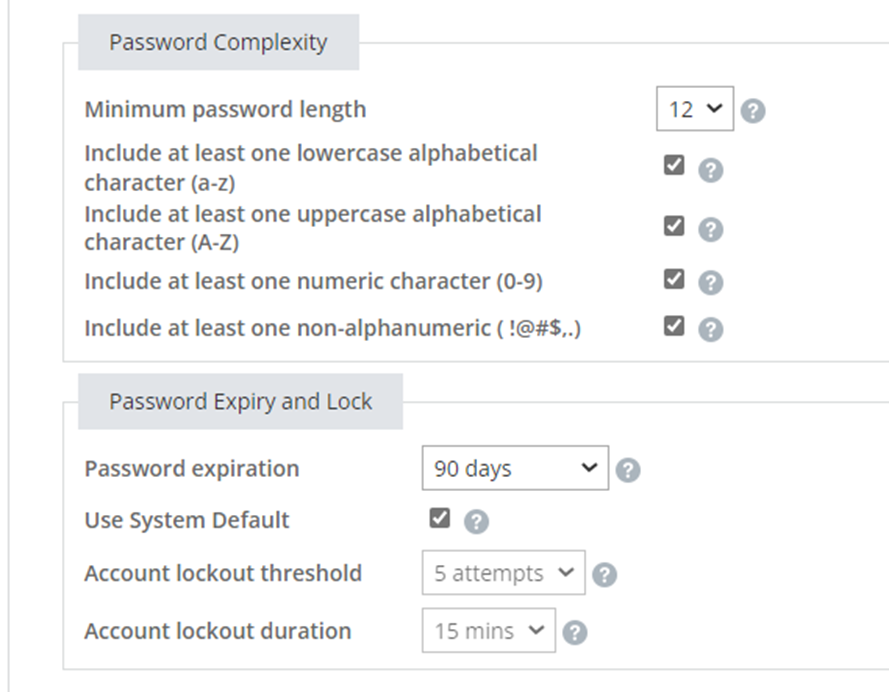
Your password must be between 7 and 48 characters and include a minimum of one of each of the following: an uppercase letter, a lowercase letter, and a number—special characters are optional.
Your username must be between 5 and 34 characters. It can contain alphanumerical characters and the following special characters: underscore (_), dash (-), and no more than one period (.) in a row.
Note: Remember your primary username, as it cannot be changed. However, once you’ve logged into the new platform, you’ll have the option to create a secondary username which can be changed.
An e-mail address is mandatory to use the Conexus Digital Banking Platform. For the first time login, if the email address field populates, and is correct, you don’t need to validate. However, if there is no phone number, you need to enter it and validate. Entering a mobile phone number is optional.
No, you will use the username you set up when you first logged into the new Conexus Digital Banking Platform.
Yes, you can use biometric authentication for both Apple (Face and Touch ID) and Android (Fingerprint) devices for the new mobile app if your device supports it.
To use our online and mobile banking services, you need to change your browser and/or device settings to enable JavaScript and cookies. We require this to detect when your online banking account is accessed by unknown or unexpected devices while utilizing Conexus’ banking services to assist in determining potentially fraudulent activity. Doing a quick search in your browser (how to enable cookies and how to enable JavaScript) will bring up detailed instructions for you to follow or you can refer to your browser’s Help section. In addition, you can also try using incognito or a private browsing mode.
Absolutely not. The Conexus Mobile App is free for our members to download, and you will never be charged for using the app. However, since the app uses data, your carrier may charge, so standard data and messaging rates may apply.
Depending on your device, open either the Apple App Store or Google Play store. Search Conexus, the new app is called Conexus Mobile, and click on install. Once you login to the new app, your old Conexus app will no longer work.
Our mobile app is most compatible with:
-
iPhone operating systems: iOS 14 and up
-
Android mobile devices running operations systems: 10 and up
If you want to use a tablet or iPad, our new digital banking platform is responsive and works best through the mobile browser!
Go to the pre-login page (the page with the Conexus logo and the Welcome message), click on the hamburger menu (three lines) at the top right. The app version is centered at the bottom.
Yes, the Quickview feature displays the balances of your accounts at any time the app is open, without needing to log in first. Quickview can be found on the menu located at the bottom of your screen under More > My Conexus > Widget Settings
-
Toggle the widget on
-
Click add new
-
Name the widget (this will be displayed on the log in screen)
-
Select which accounts you’d like to show up
-
Click the (+) in the top right corner to add the account
-
To add more accounts, click add new
To view more of your transaction history:
-
Go to Latest Activity at the bottom of the home screen
-
Click show more
-
Click button resembling magnifying glass top right of screen
-
Input time periods you’d like to view
This is a feature that does not exist today, however, we are looking to build into the platform in the near future.
Favourite transactions are transactions that can be saved as your 'Favourites' so they can be re-used in the future, making these transactions quick and easy to complete.
Favourite transactions can be customized with a name and photo and can be edited at any time.
You’ll need to complete a transaction like transfer between accounts. Once your transaction was successfully completed, you’ll see a star that says Favourite. Click Favourite and then you can name the favourite transaction and click save.
You'll can see them on your dashboard or by looking under My Conexus > Favourites > Favourite Transactions on web or My Conexus > Customize preferences > Favourite Transactions on the mobile apps.
When visiting CRA’s My Individual Account or any other Government of Canada website that offers Interac sign-in service, select the “Sign-In Partner Login” option, then choose the Conexus Credit Union logo and follow the steps to login with your online banking username and password.
It was previously communicated that you’ll need to use your old login information (card number and password) to access Interac sign-in services. As of May 29, 2023, you must use your username and password, the same information you use to log in to our new online banking platform.
If you’re a Conexus member and are registered for online and mobile banking, then you can use the sign-in partner service.
The signer can but the delegate cannot.
We are committed to keeping your confidential information as safe as possible. No passwords or personal information (i.e.: name, address, date of birth, etc.) are exchanged. Conexus won’t know which government service you’re accessing and the government won’t know that you’re signing in with your Conexus online banking username and password.
Yes! Follow the below steps to get set up.
-
Go to the CRA My Account page, click the "Sign-In Partner Login” button.
-
On the Sign-In Partner page, select the Conexus logo. This will take you to a Conexus login page.
-
You’ll be directed back to the CRA site and asked for your SIN, date of birth and an amount from a random line on your last tax return. Once you successfully answer these questions, you'll have limited access to your CRA account. You’ll be asked to choose to have a security code sent by mail or you can call CRA and have one emailed to you.
-
Once you enter that security code, you’ll have full access to your CRA account with your Conexus credentials.
Please call our Member Contact Centre at 1-800-667-7477.
To create an Interac profile:
-
Log in to digital banking
-
If you’re using online banking, under Transfers > Interac e-Transfer select Profile. If you’re using the mobile banking app, tap the Transfer menu, at the top tap Interac e-Transfer and the Profile.
-
Create Interac profile
-
Log in to digital banking
-
If you’re using online banking, under Transfers > Interac e-Transfer select Autodeposit. If you’re using the mobile banking app, tape the Transfer menu, at the top tap Interac e-Transfer and the Autodeposit.
-
Click Add Autodeposit
-
Follow the steps provided
To send someone an Interac e-Transfer, they need to be in your list of contacts.
-
Log in to digital banking
-
If you’re using online banking, under Transfers > Interac e-Transfer select Manage contacts. If you’re using the mobile banking app, tap the Transfer menu, at the top tap Interac e-Transfer and then Manage Contacts
-
Click the Add contact button
-
Enter the recipient’s name, email address and/or mobile phone number and notification method
-
Enter a security question that the recipient will know the answer to, as well as the security answer they must provide to receive and deposit the money.
-
Confirm your contact details
-
Click Continue
To send an Interac e-Transfer you must have a profile created and the recipient added to your contact list.
-
Log in to digital banking
-
If you’re using online banking, under Transfers > Interac e-Transfer select Send money. If you’re using the mobile banking app, tap the Transfer menu, at the top tap Interac e-Transfer and then Send money
-
Select the account you want to transfer funds from
-
Select the recipient and the amount of the transfer
-
Click Continue
Be sure to let the recipient know the answer to the security question (but don't send it along with the transfer). Your account will be debited the transfer amount immediately, plus a service fee (if applicable).
You'll be able to easily access e-Transfer from the homepage of the new digital banking platform with the quick link 'Send Money'.
To receive an Interac e-Transfer you must have a profile created.
-
When someone sends you an Interac e-Transfer, you will receive a notification through email or text message
-
Click on the link to access a secure Interac website where you’ll be asked to select your financial institution
-
Sign into online banking or our mobile banking app
-
Enter the answer to the security question and click Accept
-
Select the account you would like the funds deposited into and click Continue
-
Confirm transfer details and click Confirm
Note: If you have Autodeposit turned on, the money will be automatically deposited into your account and you will be notified via email.
To request money through Interac e-Transfer you must have a profile created and the contact added to your contact list.
-
Log in to digital banking
-
If you’re using online banking, under Transfers > Interac e-Transfer select Request money. If you’re using the mobile banking app, tap Transfer in the bottom footer, at the top tap Interac e-Transfer and then Request money
-
Select the contact you want to request funds from and enter the amount
-
Choose the account you want the funds deposited into
-
Click Continue
You can cancel pending transactions by:
-
Log in to digital banking
-
If you’re using online banking, under Transfers > Interac e-Transfer select Pending. If you’re using the mobile banking app, tap the Transfer menu, at the top tap Interac e-Transfer and then Pending
-
Choose the pending transfer you want to cancel and click the Cancel or “X” button
-
Click Continue and confirm transaction details
If you need to send or receive money quickly and safely, a wire transfer can be the most reliable option. To send or receive a wire transfer visit or contact your local branch or the Member Contact Centre at 1-800-667-7477.
Click here to learn more.
-
Log into the Conexus Digital Banking Platform
-
Hover over Payments
-
Click Manage payees
-
Click Add payee
-
Enter bill payee in the Search for a payee by the name field
-
Click on Payee from the results list
-
Enter your account number
-
Click Continue
-
Confirm the payee details are correct
-
Click Continue
-
Enter your One-time Password – that was sent either via SMS or email
-
Click Continue
Yes, you can make multiple bill payments through online banking and the mobile app.
You might have consolidated your accounts on our old platform. You can toggle between your accounts with the profile switching feature. If you have any questions, please contact your business advisor or our Member Contact Centre.
-
Go to My Conexus
-
Under Business Services
-
Click Create Delegate
-
Add in delegate’s information
-
And click Save
Managing your delegate is being able to edit your delegate – change the delegate's contact information and permission level. You can also lock their access so they can't login, do a password reset and unlock their security credentials.
As a delegate, you can self-serve password reset (“Forget password”). Alternatively, a signer with digital banking access can reset the password for the delegate. The delegate will be forced to reset their password the next time they log in. (The delegate will need to know their previous password to change their password.)
Once created, delegates cannot be deleted. A delegate's access must be locked to ensure they are unable to access digital banking. This can be done under My Conexus > Business Services > Manage Delegates.
The authorized signer has 7 days to act on a transaction prior to expiry of the initiated transaction.
You can download your transactions into the format needed for QuickBooks and Quicken by scrolling to the bottom of your account and selecting the "export" button. These documents can then be uploaded into QuickBooks or Quicken.
Please note if you're connected to our old digital banking platform on QuickBooks or Quicken Online accounts, you’ll need to disconnect your online banking information before you can upload a file to it.
To disconnect go to:
-
Settings > Chart of Accounts
-
On the Bank Account GL under Action choose "Edit"
-
Then on the next screen there will be an option to disconnect and save
There are 30 Conexus Credit Union branches. Come in and talk us – we’re ready to help you with a wide range of financial transactions.
If you’d like to chat about opening an account, arranging a mortgage, or applying for another of our products, we recommend booking an appointment. To book an appointment, simply call your local branch, or Connect with us
Using a web browser
-
Contact a branch or our Member Contact Centre to get access to Conexus Digital Banking
-
If this is your first-time logging into Conexus Digital Banking, have your card number (PAN) handy and navigate to the login page.
-
Enter your card number/PAN and temporary password
-
You will be asked to create a username
-
You will then be asked to choose a new password. The password must be between 7 and 16 characters and include a minimum of one of each of the following: uppercase letter, lowercase letter and number.
-
You will need to enter and validate an email address and/or mobile phone number before continuing.
The Conexus Mobile App is available to download from the Apple App Store and from the Google Play Store. It’s a fast and secure way to handle everyday banking wherever and whenever it suits you. It’s a fast and secure way to handle everyday banking wherever and whenever it suits you.
To get set up:
-
Contact a branch or our Member Contact Centre to get access to Conexus Digital Banking.
-
Click the Log in button in the top right corner.
-
Enter your card number/PAN and temporary password.
-
You will be asked to create a username. The username must be between 5 and 34 characters and can contain alphanumerical characters and the following special characters: underscore (_), dash (-), and no more than one period (.) in a row.
-
You will then be asked to choose a new password. The password must be between 7 and 48 characters and include a minimum of one of each of the following: an uppercase letter, a lowercase letter, and a number—special characters are optional.
Alerts are security feature that notifies you by email and/or text message when certain activities have occurred on your accounts. We recommend you set them up so you’ll be notified if a transaction or action has happened that you didn’t perform.
You can set-up Account Alerts, Security Alerts and Transaction Alerts.
After logging in to digital banking, you can set-up your alerts under Message & Alerts (on browser) or Alerts (on mobile app). To turn an alert on, click on the channel to toggle it on and choose the frequency or parameter for the alert.
Yes! You can change your current alerts or add new ones at any time through the Conexus Digital Banking Platform using either the mobile app or desktop.
Mobile Deposit is a feature on our mobile app that allows you to deposit cheques by taking a photo of them and submitting them to Conexus, anywhere, anytime.
How do I deposit a cheque?
Sign in to the mobile app, tap on More on the bottom bar, then tap Mobile Deposit
-
Select the account you’d like to deposit your cheque into, and enter the cheque amount
-
Using your device, take a picture of the front and back of your cheque
-
Confirm deposit details
NOTE: The funds will immediately appear in your account, but normal hold times still apply for all deposited amounts.
If you're having trouble depositing a cheque via your mobile device, try leaving a border around the whole cheque and use a dark background before taking the picture.
US Funds, post-dated and third party cheques cannot be deposited.
Apple Pay is compatible with an iPhone 6 or higher, or an iPhone 5 with Apple Watch.
iPhone:
-
Open the Wallet app on your device
-
Press the plus + sign in the upper right corner
-
Follow the onscreen instructions to add your Conexus Member Card debit card
Apple Watch:
-
Open the Apple Watch app on your device
-
Tap “Wallet & Apple Pay” and select “Add a credit or debit card”
-
Follow the onscreen instructions to add your Conexus Member Card debit card
If you’re using an iPhone, hold it to the payment terminal with your finger on the home button. A beep and vibration will confirm your payment.
For an Apple Watch, hold the watch to the payment terminal and double click the side button. A tap and a beep with confirm your payment.
In-store:
Apple Pay is accepted at retailers that display the Apple Pay or contactless logo.
In-app purchases:
Use your Conexus Member Card debit card to make purchases within apps by selecting the Apple Pay option. Learn how this works.
In-Safari:
The Safari internet browser on your iPhone, iPad and Mac will indicate which online retailers accept Interac Debit for Apple Pay. Get more information.
Google Pay is the fast, simple way to pay in millions of places — online, in stores, and more. It brings together everything you need at checkout and protects your payment info with multiple layers of security. Plus, you can manage your account wherever you want - on the web or in the app. When you pay in shops, Google Pay doesn’t share your actual card number, so your information stays secure. Plus, you can check out faster with the device that’s already in your hand – no need to dig for your wallet.
Learn more here.
On your smartphone:
-
Download Google Pay from the Google Play Store.
-
Open the Google Pay app.
-
Tap the (+) sign.
-
Follow the on-screen instructions to add your Conexus Member Card debit card
On your wearable:
-
Open Google Pay on the watch.
-
Tap (+) to Add Card to choose from cards on your phone.
Follow the on-screen prompts to complete setup
With your smartphone:
-
Unlock your phone.
-
Hold your phone over the terminal until you see a blue check mark on the screen.
With your wearable:
-
On your watch, open the Google Pay app.
-
Hold your watch over the contactless payment terminal until you hear a sound or feel vibration from your watch.
With Google Pay, you can check out in apps without having to enter your payment information. Shop, order takeout, or get tickets to that just-announced show with the simple press of a button.
Add your Conexus Member Card debit card to Samsung Pay to easily pay for purchases with your Samsung device.
-
It’s easy: Simply hold your device to the payment terminal.
-
It’s secure: Samsung Pay has built-in features to help ensure your accounts are secure.
Learn more here.
Samsung Pay is available on the latest Samsung devices: Galaxy S9 & S9+, Galaxy S8 & S8+, Galaxy S7 & S7 edge, Galaxy S6, S6 edge & S6 edge+, Galaxy Note9/Note8/Note5, and Galaxy A8/A5.
Samsung Pay comes pre-installed on most recent Samsung phones. If you don't have the app, you can download it from the Google Play store. You’ll need to be signed in to your Samsung account to use Samsung Pay.
-
Open Samsung Pay and register your Samsung Pay PIN.
-
Follow on screen instructions to add your Conexus Member Card debit card and then select your preferred method to verify the card.
-
Select your desired security or authentication options.
-
From the lock screen, swipe up from the home button or open the Samsung Pay app.
-
Select your Conexus Member Card debit card and authorize the payment using your PIN, fingerprint, or iris scan.
-
Hold your phone over the payment terminal to complete your transaction.
Samsung Pay using your Conexus Member Card debit card works wherever Interac Flash® is accepted. Just look for the Interac Flash logo or contactless symbol at the checkout. Some stores will also display the Samsung Pay logo. You cannot use Samsung Pay for international purchases.
Samsung Pay is governed in accordance with the Terms and Conditions that you accepted when adding your card to Samsung Pay, and the Conexus Member Card debit card Agreement that you signed when receiving your card.
Keeping our member’s information safe at Conexus is a top priority and we’re constantly looking for ways to increase security and processes. As a result, we are launching a new way to send privileged information to members through Mimecast. The Secure Messaging Portal allows recipients of a secure message to read and respond to it.
You can go directly to it using this link here or by clicking on the link in the notification email you receive when a secure email is sent to you.
When you are first sent an email through the Secure Messaging Portal, you will be notified by email that you have received a secure message. To retrieve the message:
-
Click the link in the notification email, redirecting you to the Secure Messaging Portal
-
Create a password based on Mimecast’s requirements
-
Click Confirm
-
Log in to the portal using your email address and password to access the secure email
-
Click the Link to access the secure message in the email.
-
Enter your Email Address.
-
Click on the Next button.
-
Enter your Secure Messaging Portal Password.
-
Click the Log In button
Note: If this is your first time logging in to the Secure Messaging Portal, see the First Time Users section.
Ensure you have the following: